BitRaser Mobile Eraser & Diagnostics

BitRaser Mobile Eraser & Diagnostics / 4. Working with BitRaser Mobile Eraser & Diagnostics / 4.1. General Settings
4.1. General Settings
Before starting an Erasure or a Diagnostic process, it is important to understand and configure various settings of BitRaser Mobile Eraser & Diagnostics. Click the Settings icon on the top right corner of the screen. Use this window to change the various general and default settings of the software. This window has the following tabs:
The General Settings tab allows you to configure erasure warning settings, grid settings, cloud report settings, delete the local reports and select the default erasure method.
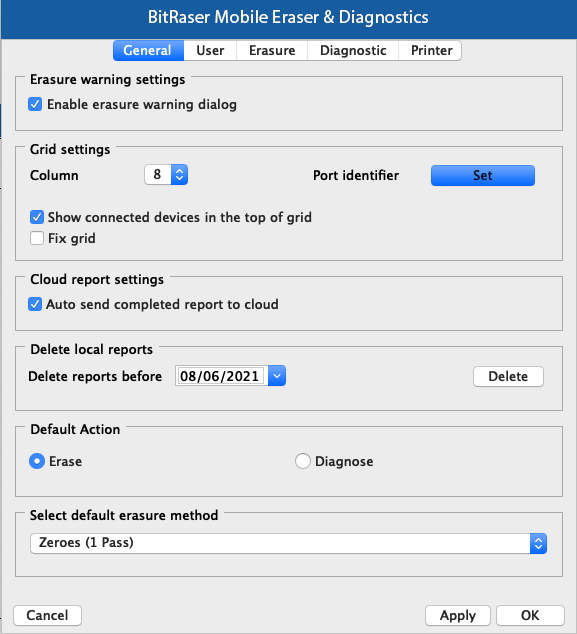
The following fields can be edited from this section:
-
Erasure Warning Settings:
-
Enable Erasure Warning Dialog: Check this field to enable the warning message before the initiation of the erasure process.
-
-
Grid Settings: This option allows you to set the layout of the grid which is shown when we connect the devices.
-
Column: Allows you to predefine the number of columns in a grid.
-
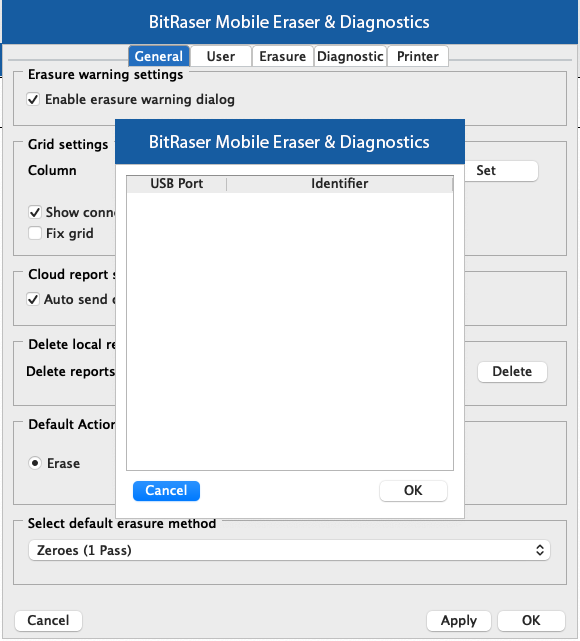
Port Identifier: Allows you to predefine name of each port to identify the port easily. Click on Set. The popup window shows a list of USB ports. Type the name against each port in the Identifier column and click OK to save or Cancel to exit without saving:
-
Show connected devices at the top of the grid: Checking this field allows you to display the connected devices at the starting of the grid.
-
Fix Grid: Checking this field allows you to fix the grid columns i.e., they cannot be moved.
-
Cloud Report Settings:
-
Auto send report to cloud: Checking this field allows you to auto-send the report to the cloud.
-
Delete Local Reports:
-
Delete Reports before: This option allows you to delete the reports before a certain date. Specify the date from the calendar and click the Delete button. All the reports generated before the selected date will be deleted.
-
Default Action: Select a default option of Erase or Diagnose, when you connect a device to BitRaser Mobile Eraser & Diagnostics.
-
Select Default Erasure Method: Select any one of the erasure methods from the drop-down options to set the default erasure method for all devices.
Once the settings have been modified, click the Apply button to save the changes. OK applies all the changes to the software and closes the Settings menu, Cancel closes the Settings menu without saving the changes.
User settings allow you to connect BitRaser Mobile Eraser & Diagnostics application to the BitRaser Cloud. Connection to BitRaser Cloud is required to acquire the license information and to initiate the erasure or diagnostic process.

The following fields have to be filled:
|
Field Name |
Description |
|
Hostname/IP |
Hostname or IP address where the BitRaser Cloud Console is located. |
|
UserID |
UserID that is used to login to the BitRaser Cloud Console. |
|
Password |
Password which is used to login to the BitRaser Cloud Console. |
|
Status |
Connected: Shown when the connection to the BitRaser Cloud Console is active. Not Connected: Shown when there is no active connection to the BitRaser Cloud Console. |
After you have entered the values in all the fields, click Log In to login to the BitRaser Cloud Console.
Checking Enable auto login when BitRaser application starts option allows you to automatically login to the BitRaser Cloud Console when you start BitRaser Mobile Eraser & Diagnostics application.
Once the settings have been modified, click Apply button to save the changes. OK applies all the changes to the software and closes the Settings menu, Cancel closes the Settings menu without saving the changes.
The Erasure setting tab has the following two sub-tabs:
- iOS Settings:
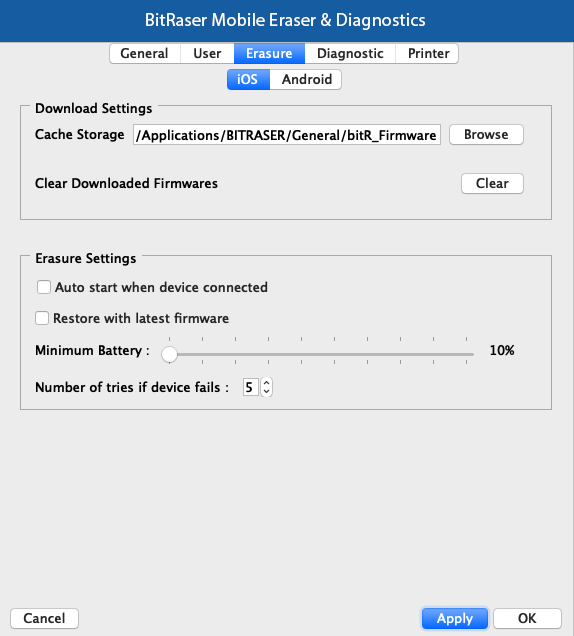
The iOS settings tab displays the firmware download and erasure settings. The following fields can be edited from this section:
-
Download Settings:
-
Cache Storage: This option allows you to select the desired location where the firmware is located. Click Browse button and specify the path using Look In dialog box. After selecting the path click OK.
-
Click Clear button to remove the downloaded iOS firmware from your hard drive.
-
-
Erasure Settings:
-
Auto start when device connected checkbox: Select this checkbox to start the erasing process automatically when you connect a device.
-
Restore with latest firmware checkbox: Select this checkbox to restore the iOS device with the latest firmware after the eraser process.
-
Minimum Battery: You can define the minimum battery percentage using the slider. This represents the minimum battery required to erase the device's data. For example: If you set the slider to 20 % it means that at least 20% battery should be there in your device for the Erase process to take place.
-
Number of tries if the device fails: Allows you to define the maximum amount of retries/attempts for the erasure process to start if in case the device is disconnected/removed in the middle of the erasure process.
Once the settings have been modified, click Apply button to save the changes. OK applies all the changes to the software and closes the Settings menu, Cancel closes the Settings menu without saving the changes.
- Android Settings:
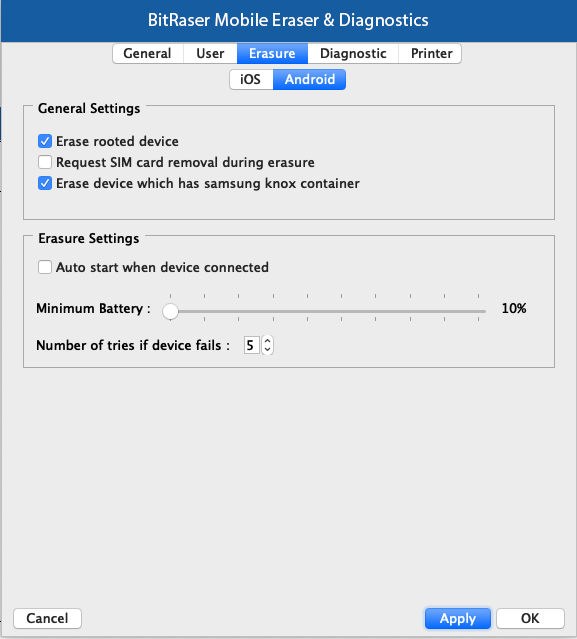
The Android settings tab displays general and erasure settings. The following fields can be edited from this section:
-
General Settings:
-
Erase rooted device: Checking this option allows you to erase an Android device even if it is rooted.
-
Request SIM card removal during erasure: Checking this option will show a message to remove the SIM card from the device before the erasure process starts.
-
Erase device which has Samsung Knox container: Checking this option allows you to erase an Android device that has a Samsung Knox container.
-
-
Erasure Settings:
-
Auto start when device connected checkbox: Select this checkbox to start the erasing process automatically when you connect a device.
-
Minimum Battery: You can define the minimum battery percentage using the slider. This represents the minimum battery required to erase the device's data. For example: If you set the slider to 20% it means that at least 20% battery should be there in your device for the Erase process to take place.
-
Number of tries if the device fails: Allows you to define the maximum amount of retries/attempts for the erasure process to start if in case the device is disconnected/removed in the middle of the erasure process.
Once the settings have been modified, click Apply button to save the changes. OK applies all the changes to the software and closes the Settings menu, Cancel closes the Settings menu without saving the changes.
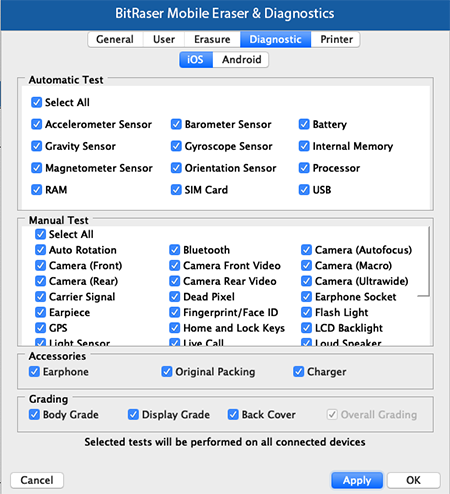
The Diagnostic setting tab has the following two sub-tabs:
| iOS Settings: | Android Settings: | |
 |
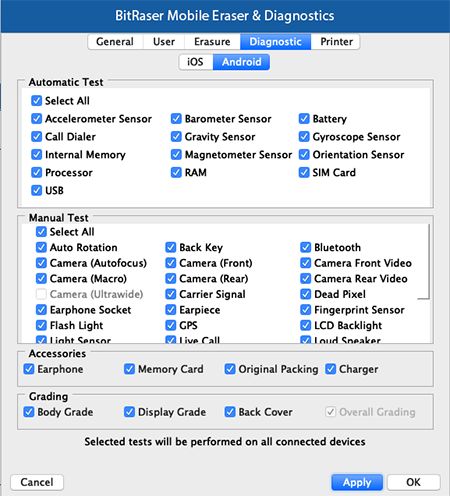 |
These tabs include the Phone number for live call field, a list of automatic tests, manual tests, accessories, grading options, and more, as outlined below:
-
Phone number for live call: Use this option to check whether the live call feature is working properly. To diagnose a live call feature, you need to enter any phone number (e.g., 121) in the Phone number for live call field, and then the device will automatically call the entered number to test the functionality. By default, 121 will be pre-filled.
-
Time Duration for Battery Drain Test: Use this option to check your mobile battery drainage over a specific period. To perform the battery drain test, select the time duration from the Time Duration for Battery Drain test slider. The device will display the battery drainage during the selected time. By default, 3 min will be selected.
-
Automatic Test: Use this option to perform an automatic test on your device. You can choose diagnostic tests by selecting the corresponding checkboxes individually or together, based on your requirements. By default, all checkboxes will be selected.
-
Manual Test: Use this option to perform a manual test on your device. You can choose diagnostic tests by selecting the corresponding checkboxes individually or together, based on your requirements. By default, all checkboxes will be selected.
-
Accessories: Use this option to check if the accessories such as earphones, original packing, charger and memory card are included with the device box. You can choose the accessories by selecting the corresponding checkboxes individually or together, based on your requirements. By default, all checkboxes will be selected.
-
Grading: Use this option to check the grading of your device, such as body grade, display grade, back cover and overall grading. You can choose the grading by selecting the corresponding checkboxes individually or together, based on your requirements. By default, all checkboxes will be selected.
The grading of your device will be displayed based on specific criteria:
-
A – Excellent
-
B – Good
-
C – Average
-
D – Bad
Note: The selected test will be performed on all connected devices.
Once the settings have been modified, click Apply button to save the changes. OK applies all the changes to the software and closes the Settings menu, Cancel closes the Settings menu without saving the changes.
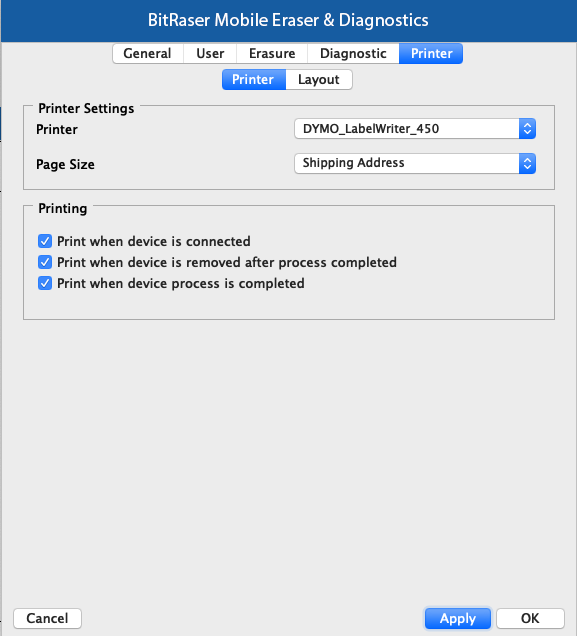
This option allows you to print the information on connected devices.
It has the following two tabs:
- Printer:
-
Printer Settings:
-
Printer: Allows you to select a printer from the drop-down list.
-
Page Size: Choose the appropriate paper size from the drop-down list that you can print on.
-
-
Printing:
-
To generate a print when you connect the device, select the option Print when device is connected.
-
To generate a print when you disconnect the device after the erasure or diagnostic process, select the option Print when device is removed after process completed.
-
To generate a print when the erasure or diagnostic process is completed, select the option Print when device process is completed.
-
- Layout:
|
Android |
iOS |
|
 |
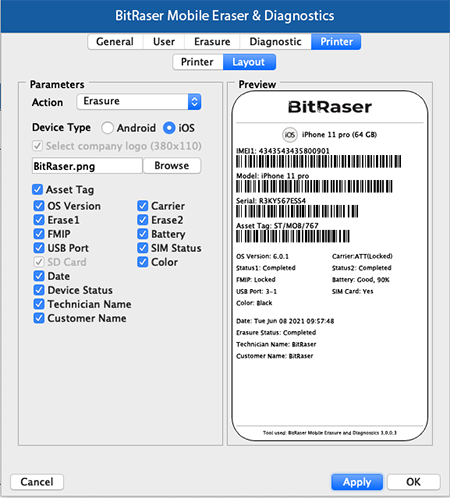 |
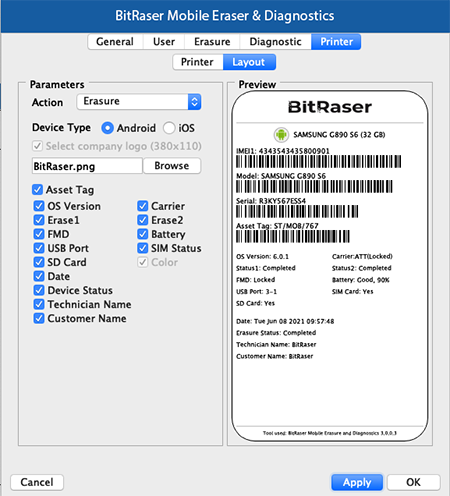
The layout tab allows you to select a list of parameters such as Action (Erasure or Diagnostics), Device Type (Android or iOS), Company Logo, Asset Tag, OS Version, and so on, for printing the device label. It also shows you the print preview of the label with all the device details selected by you.
Once the settings have been modified, click Apply button to save the changes. OK applies all the changes to the software and closes the Settings menu; Cancel closes the Settings menu without saving the changes.
 3. Getting Started