This KB will discuss how BitRaser Mobile can be configured for use to increase efficiency and operational scalability.
BitRaser Mobile Eraser & Diagnostics can be configured to allow bulk mobile device resellers to streamline the entire erasure or diagnostic process, allowing them to complete tasks more efficiently and save time.
Post-purchase of the BitRaser Mobile application you will receive an E-Mail with download instructions. You can download and install the software using those instructions, or you can simply visit the BitRaser Deployment Page to access detailed resources for:
After installing the software, you can configure it to help you save time on repetitive tasks.
Configure BitRaser Mobile Application:
BitRaser Mobile offers you the option to configure five tabs, namely 'General,' 'User,' 'Erasure,' 'Diagnostic,' & 'Printer.' Each of these tabs has been discussed in detail below.
1. General Settings
Once the application is launched, click on the ‘Settings’ icon located in the right-hand top corner and then click on the ‘General’ tab. (Refer to Image 1)
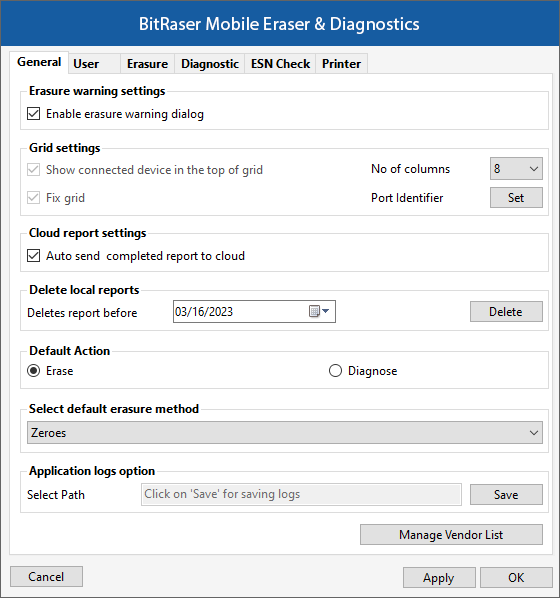
Image 1: BitRaser Mobile General Settings Tab
In the ‘General’ Tab, there are a couple of options that you can configure like
- Erasure Warning Settings: You can either ‘Enable’ or ‘Disable’ the erasure warning dialogue box. Unchecking the erasure warning box is advisable for mobile retailers and ITADs dealing with the bulk wiping of smartphones. This helps them perform ‘one-click’ erasure, saving lots of time.
- Grid Settings: The BitRaser Mobile software main screen has multiple columns that list the iOS and Android devices connected to the system. The number of columns you want to see on the BitRaser application can be set in the ‘Grid’ settings. In other words, if you choose 8 columns, the screen will show 8 columns of smartphones that are connected.
- Cloud Report Settings: Checking the ‘auto send the completed report to the cloud’ will upload the report of erasure or diagnostics on your secure cloud account as soon as the process is completed. This saves you a lot of time, and you don’t have to worry about missing any reports.
Note: This would require a stable internet connection (Wi-Fi or Ethernet) - Delete Local Reports: The BitRaser application saves all your reports on the local machine automatically. If you wish to remove old reports before a certain date, you can use the ‘Delete local reports’ option. You have the option of specifying a date after which all previous reports on the local system will be deleted.
- Default Action: BitRaser Mobile supports erasure and diagnostics of both iPhone and Android devices. With the ‘default action’ feature, you can set the action as ‘Erase’ or ‘Diagnose.’
For Example: If your requirement as an enterprise or ITAD is to primarily erase mobile devices before reallocating or disposing of them, then your default action would be ‘Erase’. On the other hand, if you are a refurbisher or second-hand mobile reseller, your primary requirement could be to ‘Diagnose’ mobile devices. This feature sets the default action which saves a lot of time while erasing or testing multiple devices. - Select Default Erasure Method: BitRaser Mobile's default erasure standard is ‘Zeroes.’ You can change the standard based on your erasure requirement and then all devices connected will be wiped with the same standard. This helps save time.
Note: BitRaser Mobile supports 10 Global Standards like NIST 800-88, US DoD 5220.22-M, British HMG IS5, etc.
- Manage Vendor List: The last option on this tab is the ‘Manage Vendor List’. BitRaser Mobile application can recognize all major smartphone brands like Samsung, Apple, OnePlus, Motorola, etc., that run on Android and iOS operating systems; however, in case there is a smartphone manufacturer that you cannot see on the list, you can click on ‘Manage Vendor List’ to add a new smartphone vendor. See the below image. (Refer to Image 2)
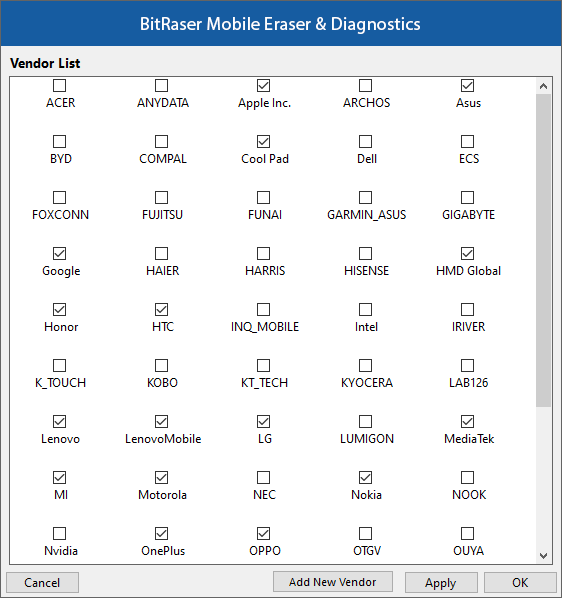
Image 2: Vendor List Screen BitRaser Mobile
How to ‘Add New Vendor’?
See the example below to see how you can add a new vendor.
For Example: If you want to add Samsung as a vendor. Do a Google search with “Samsung Vendor ID”? All mobile manufacturers and vendors provide this information free of cost and online.
After entering the Vendor Name and Vendor ID, click 'Add Vendor'. The new Vendor will be added, and the smartphones manufactured by the vendor can now be Erased or Diagnosed. (Refer to Image 3)
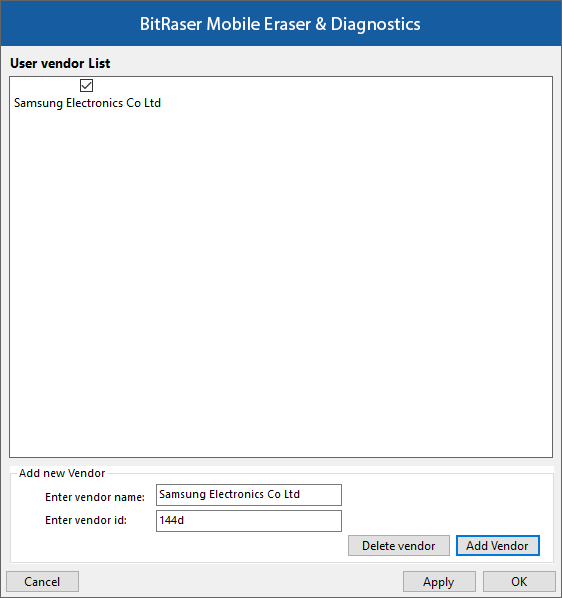
Image 3: Add Vendor Name & ID, Then Click Add Vendor BitRaser Mobile
2. User Settings:
The next tab is 'User,' which is used to connect to your BitRaser Cloud account to retrieve licenses; by default, the ‘Enable auto login’ feature is selected. As a result, whenever you launch the application, it will auto-connect to your cloud account using the credentials you previously saved. (Refer to Image 4)
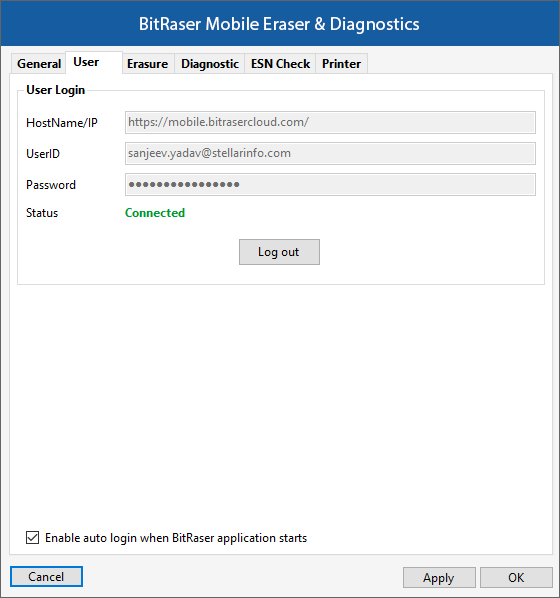
Image 4: User Tab BitRaser Mobile
3. Erasure Settings
The next tab is ‘Erasure’. (Refer to Image 5)
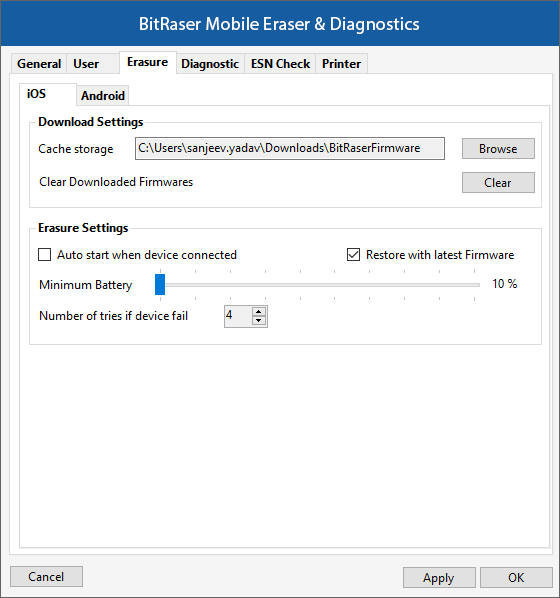
Image 5: iOS Erasure Tab BitRaser Mobile
The first option in this tab is for 'Erasing iOS' devices, with the following options:
- Cache Storage: You can mention the location where the cache will be stored by pressing browse and then selecting the path of your choice.
- Clear Downloaded Firmware: When an iOS device is erased, the device's firmware is also erased. The firmware must be reinstalled on the device before it can be used again. If you have multiple phones with different Firmwares they all must be downloaded and installed on the device. This takes up a lot of space on the system, so you have the option to clear firmware once they are no longer required.
- Auto Start Erasure: To save time,e you can check the ‘Auto start when device connected’ feature, it will automatically start erasing devices as soon as you plug them in. This is beneficial for large ITADs processing multiple smartphone erasures.
- Restore with Latest Firmware: This allows you to update different iOS devices to the latest version of iOS Firmware automatically.
- Minimum Battery: You have the option to set the minimum mobile battery. It will ensure that the device doesn’t switch off in the middle of the erasure process.
- Number of Erasure Attempts on a Device: The final option in this tab allows you to specify the number of times the software will attempt device erasure before marking the process as failed for that mobile device.
The next option in the ‘Erasure’ tab is ‘Android’ devices. (Refer to Image 6)
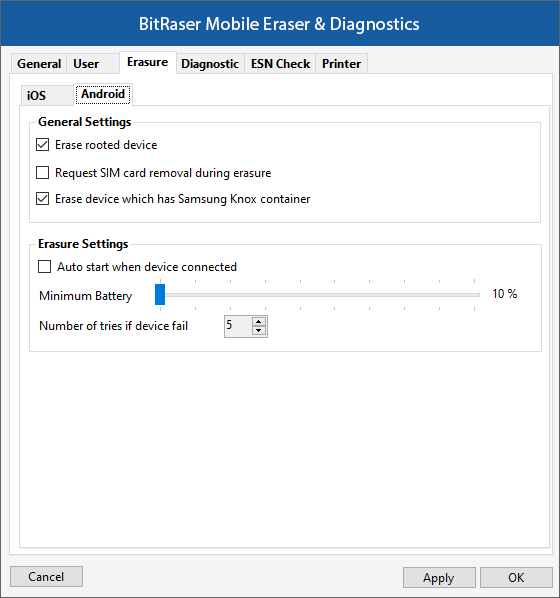
Image 6: Android Erasure Tab BitRaser Mobile
For 'Erasing Android' devices, the following options are available:
- Erase Rooted Device: Selecting ‘Erase rooted device’ will enable the erasing of rooted Android devices. Rooting is the process by which a user can gain access to the Android OS code and make mobile developer-level changes. However, for some manufacturers, rooting an Android device voids the device's warranty.
- Request SIM Card Removal During Erasure: You have the option to be reminded to remove the SIM card before wiping the mobile device. If you choose this option, the software will prompt you to remove the SIM card before proceeding with the erasure process for each device.
- Samsung Knox Container: This container acts as a security system for protecting Samsung mobile devices. By selecting the ‘Erase device which has Samsung Knox container’ BitRaser Mobile will wipe these devices as well.
- Minimum Battery: Lastly, similar to the iOS options you have the option to set the minimum battery and the number of erase tries the software will make.
4. Diagnostic Settings
The next tab is ‘Diagnostic’. (Refer to Image 7)
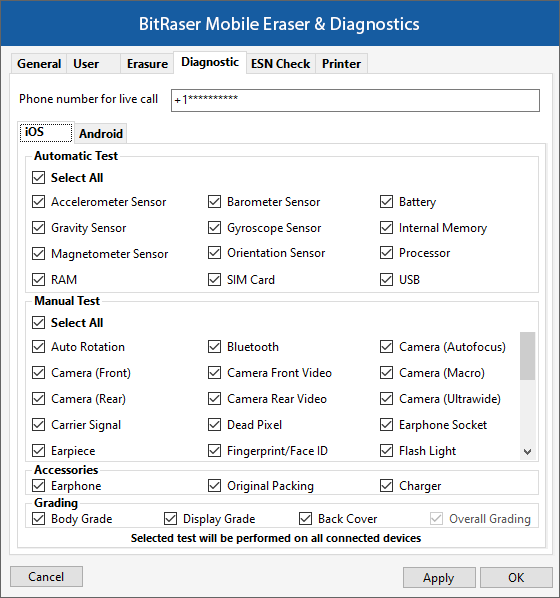
Image 7: iOS Diagnostic Tab BitRaser Mobile
BitRaser Mobile Diagnostics can test both Android & iOS devices using over 50+ Automated & Manual Tests. However, you are not required to perform all of the tests if you do not wish to. You can 'Select' which 'Automatic' and 'Manual' Tests you want the BitRaser Mobile application to perform based on your business or your customers' needs.
All tests are selected by default and will be performed. The same feature is also available for Android devices.
Note: The 'Phone number for live call' option allows you to enter a phone number that will be called during the 'Live Call' Mobile Diagnostic test.
5. Printer Settings
The next tab is ‘Printer’. (Refer to Image 8)
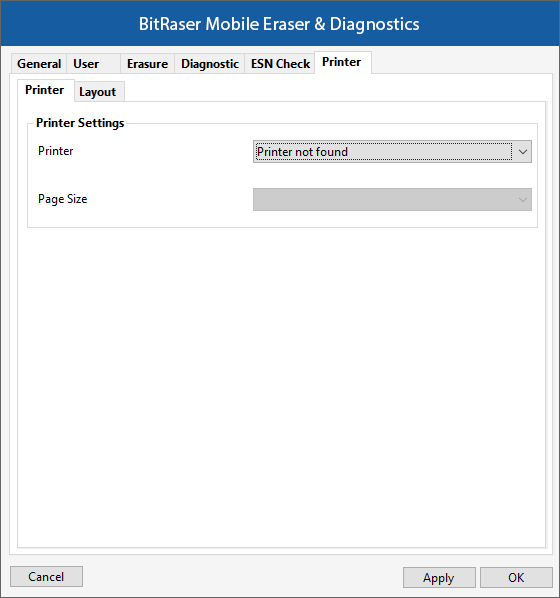
Image 8: Printer Tab BitRaser Mobile
In this tab, you can add a printer for printing device labels. BitRaser Mobile currently supports Brother QL-700 and the Dymo Label Writer 450 brands of label makers. These labels are very useful for asset tagging and managing device inventory. (Refer to Image 9)
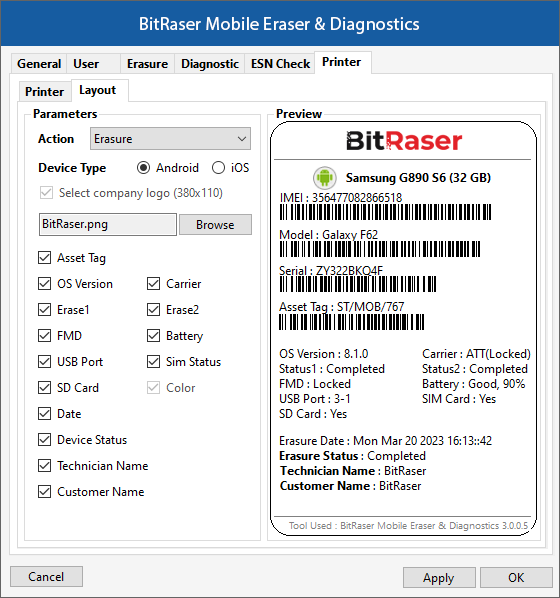
Image 9: Erasure Layout Tab BitRaser Mobile
The ‘Layout’ tab offers you the option to configure how the device label will look when you print them, you can add your company logo and decide which information you want to display on the labels. Similar options are provided under the ‘Diagnose’ tab. (Refer to Image 10)
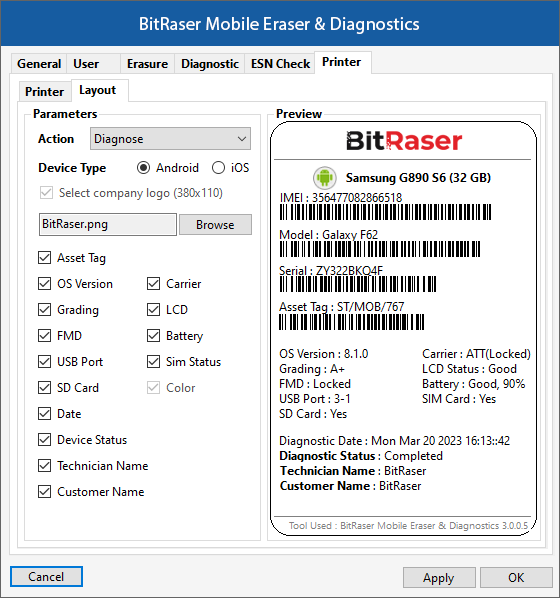
Image 10: Diagnose Layout Tab BitRaser Mobile
Now that you know how to configure BitRaser Mobile, you can tailor the software to your specific business needs, for increasing efficiency and achieving scalability.

