BitRaser File Eraser Network
- 1. About BitRaser File Eraser Network
- 2. Quick Overview
 3. First Steps
 4. How to
- 5. Frequently Asked Questions (FAQs)
- 6. About Stellar

BitRaser File Eraser Network / 4. How to / 4.6. Work on Reports / 4.6.1. Filter and Sort Reports
4.6.1. Filter and Sort Reports
BitRaser File Eraser Network allows you to tailor your search criteria. You can specify date ranges for a more refined search. Utilize the 'All' drop-down button to toggle between different erasure report types. Once set, the software will display a list of reports meeting your criteria, showcasing vital information such as Report ID, Type, Date, Total Files and more. Easily manipulate the display order with intuitive arrow controls. The Action tab offers convenient shortcuts for previewing reports or seamlessly sending them to the BitRaser Cloud. For further customization, delve into Report Settings accessible at the bottom left corner. Lastly, preserve your findings by saving reports in PDF or XML formats with a simple click. Mastering report management has never been more efficient.
Steps to Filter and Sort reports:
1. Run BitRaser File Eraser Network.

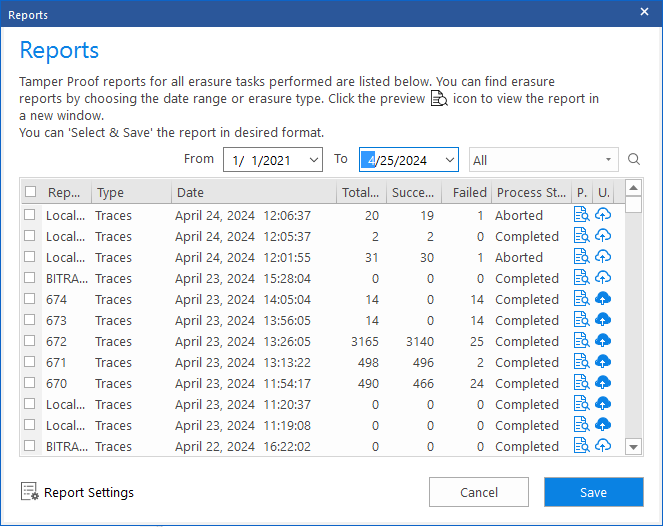
2. Once you have successfully logged into your domain using administrator credentials, select Reports option from the Home menu. Reports window appears as shown below.

3. The upper right pane of the screen, shows the criteria to be entered. This can be set up depending on what the user wants.

4. Specify the date range in the From and To fields, if you want to search reports for processes performed from a specific period i.e., between two dates.
5. The 'All' drop-down button displays:

-
All: Shows all erasure reports.
-
Erase Traces: Shows the erasure reports of Erase Traces.
-
Erase File Folders: Shows the erasure reports of Erase File Folders.
6. The software will show all the reports fulfilling the search criteria. A list of all the reports generated on the specific time period mentioned, along with the information like Report ID, Type, Date, Total Files, Successful, Failed, Process Status, and Action are displayed. The arrows given next to each entity can be used to show the details in ascending or descending order.

Note: To view and use arrows for sorting, you must tap on the entity. Only one arrow can be utilized at a time for sorting.
7. The Action tab provides the shortcuts to perform the following functions:
-
Preview
 : This function enables you to see how the Report looks like before you save or print it.
 -
Send to Cloud
 : This option allows you to send the reports over the BitRaser Cloud.
8. Click Save if you want to save the report in PDF and XML formats.
9. In case you want to customize the report, select the Report Settings button ![]() located at the bottom left of the screen.
located at the bottom left of the screen.